Hi everyone! The following guest post is by Sabina Idler from Usabilla. She introduces their Usabilla Survey tool and how it can be used to user-test WireframeSketcher prototypes. Enjoy!
Good user interfaces need testing. A user centered design approach is the only way to assure you are designing the right kind of product in the right kind of way. With early stage user testing you can gain insights into actual user behavior and their perception. There are many tools out there, that help you gain these insights quickly and with low budget.
Wireframing tools, such as WireframeSketcher are the ideal solution to put your concept onto paper – from your first sketch to your final mockup, wireframes make your product visual and usable, before there is even a design. Then there are remote user-testing tools, such as Usabilla, that help you gather feedback and validate your design ideas quickly.
When combining WireframeSketcher and Usabilla, they become the perfect tool set to help you design for your users. Bring your ideas on paper and ask what your users think of them. All without hassle and without the usual high costs.
Introducing Usabilla Survey
Usabilla Survey is an online tool for automated remote user testing and visual surveys. You can set up a visual survey in only a few minutes and gather both quantitative and qualitative feedback on any design. It integrates usability testing in your daily work-flow and helps you improve your design with high quality feedback.
Every survey has its own unique test link. With this link you can invite people to participate via email, social media, or through a special invitation widget directly on your site. Participants can answer your questions, simply by placing points and notes on top of your design. You can then analyze the results in your personal Usabilla dashboard. The advanced analysis section with interactive heat maps makes analyzing your results easy and fun.

Test WireframeSketcher prototypes with Usabilla Survey
Let’s take a look at how easy it is to set up a Usabilla Survey. If you already have your WireframeSketcher prototype at hand, you can gather valuable user feedback in only three simple steps: (1) Sign up for a Usabilla Survey account and create a visual survey with your wireframes, (2) invite people to give feedback, and (3) analyze your results.
1. Set up your Usabilla Survey
If you don’t have a Usabilla account yet, jump over to Usabilla.com and sign up for a 14-day free trial. Choose the pricing plan that best suits your needs, but don’t worry about it too much since you can change or upgrade your subscription at any time. If you already have a Usabilla account, just log on and create new test.

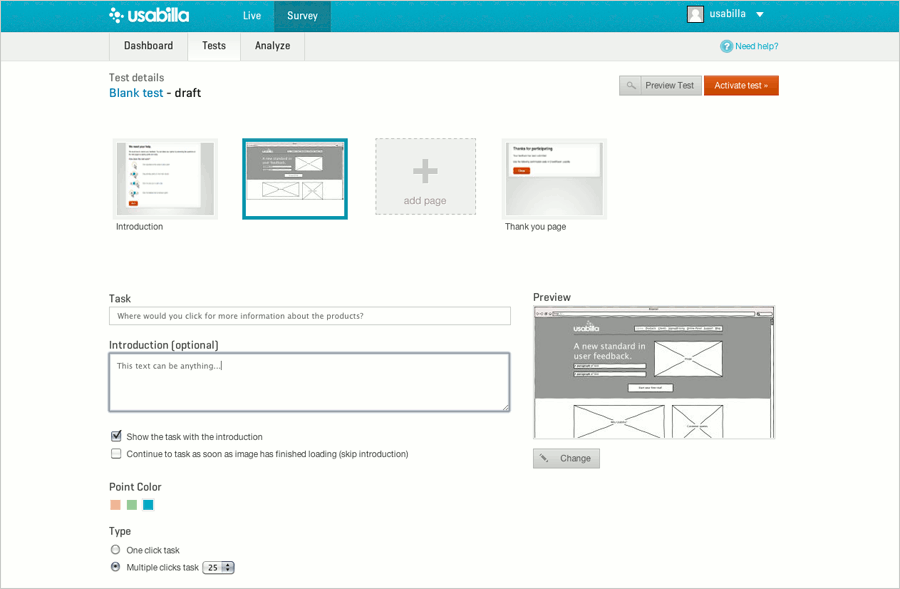
Setting up a new test couldn’t be easier. You can either select one out of many predefined test templates, or create your own test from scratch. You can personalize the test introduction and thank-you page and talk to your users in your own tone of voice. Then simply upload your WireframeSketcher prototype and add any task or question you want. Note that you can test designs for desktop, tablet, or mobile. Usabilla Survey works the same on any device.
When building wireframes for your Usabilla survey, keep in mind that Usabilla only supports static images. Export your WireframeSketcher prototype to PNG in order to include it to your test.
Usabilla Survey offers two different kind of questions. (1) Open questions: People can answer them by placing multiple points and adding notes. You can gather both quantitative and qualitative insights with these questions. (2) One-click tasks: People answer these questions by placing only one point. These questions are ideal for measuring performance (e.g. call to action) and A/B testing.
2. Invite participants
After promoting your test you’ll get a unique link to your test. People can simply open this link in a web browser to participate. There are several ways to recruit participants:
- Spread the test link through social media channels, such as Twitter, Facebook, or LinkedIn.
- Send the test link to contacts from an existing mailing list.
- Install the Usabilla invitation widget on your website to recruit participants. The code for this is available on the Promote page of your test.
- Recruit participants using an external recruitment tool, such as Ethnio or Usabilla online panel. We can recruit large numbers of targeted participants for you.

In addition to the visual survey, you can also add a classic form to your test. For example, this can be handy or gathering additional information about your test participants.
3. Analyze results

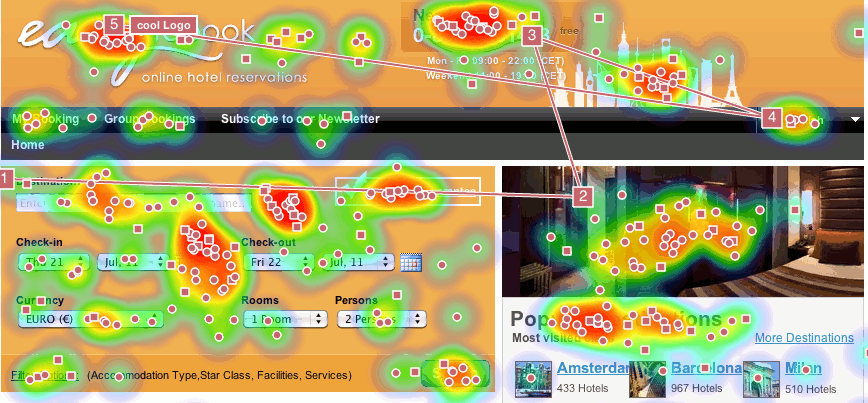
The power of Usabilla Survey lies in the visual and intuitive analysis of your results. All answers given by participants will be plotted on interactive heat maps. You will be able to select, compare, and save areas of interest, track click paths, and analyze comments within their visual context.
Check out the results of one of our demo cases and see for yourself how easy it is to analyze your results.
Author bio

Sabina Idler is a community manager and UX specialist at Usabilla. She is passionate about good Usability and the User Experience, and she believes that Design is the key to both of them.
Hi everyone!
Today’s release adds more power to Drag & Drop and Copy & Paste gestures. Drag & drop can now be used to quickly link screens. Copy & paste adds handling for more source types. Other changes include minor improvements and bug fixes. Read on for more details.
Screen linking via Drag & Drop
One of our long-standing issues is bad usability of screen linking. Right now to link two screens you need to go through screen selection popup that presents available screens in a flat list. It can be frustrating because you can clearly see the target screen in Project Explorer but you still have to find it again in that list.
No more. You can now drag the screen file from Project Explorer view directly in the Screen Editor and drop it on the item you want to link. Since drag & drop is already used for inserting components you need to hold a modifier key (Alt or Ctrl+Shift on Windows, Ctrl on Mac, Ctrl+Shift on Linux) to toggle linking mode. The mouse cursor will change to indicate linking mode and items that can be linked will be highlighted under the cursor while you drag over them.

Improved Copy & Paste
In time we have accumulated quite a few requests for various Paste action improvements. I took my time and went through all of them and came up with what I think is a greatly improved Copy & Paste action. Here’s what changed:
- Added new Paste in Place action with Ctrl+Shift+V shortcut. Paste in place keeps the original coordinates of the copied object and does not shift the copy right and down.
- Added support for pasting image files from local file system. You can now copy images in your file explorer and then come back and paste them in Screen Editor. This will automatically import images in assets folder and add them to the screen.
- Added support for pasting resources from Project Explorer view. You can now copy images and screens in Project Explorer and then paste them in Screen Editor. Component or Image widgets will be automatically created and inserted. Pasting screens also works with Storyboard Editor. All this was already possible via drag & drop but now those who prefer copy & paste can use it too.
- The most annoying issue with Paste was that it would place objects outside of current viewport when zoomed or scrolled and users had to hunt those objects down to move them back. This is fixed now and Paste will always place objects inside the current viewport.
- Improved Paste to create Label widget instead of Text when short text is pasted.
Easier screen cloning
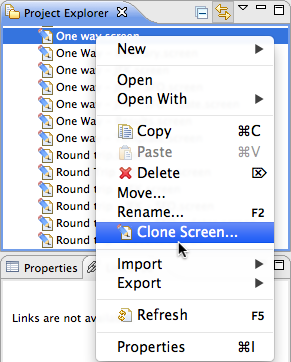
One place where Copy & Paste wasn’t working so well is in Project Explorer view when it was used to clone screens. There is now a dedicated Clone Screen action in context menu:

It works exactly as New Screen wizard so you can quickly choose a new screen name and start editing it right away.
Other changes
- Fixed Convert to Component action to preserve z-order of components
- Fixed image drag & drop from Internet Explorer in Protected Mode
- Fixed link tooltips that were empty for points-to-itself links
- Fixed image flicker in HTML when viewed with Chrome and Dropbox
- Improved Save As dialogs to pre-select file name without extension
- Fixed Wireframing property page to appear in PHP Explorer view in PDT
- Fixed iPad stencil that had non-unique ids
- Added Matrix Flight Search example project that shows how a real world prototype might be organized
Please keep your feedback coming! Your collective feedback is what drives WireframeSketcher forward and makes it a wireframing tool that you can safely depend on.
What’s next
In coming weeks we plan to host a couple of guest blog posts that demonstrate popular prototype testing services and how they can be used with WireframeSketcher. So don’t be surprised when you see unfamiliar content on our blog. If those post prove interesting to you then we’ll look more for this kind of content in the future.
Updating
To update to the latest version of WireframeSketcher use Help > Check for Updates, or just download it from our website.
The version number of this release is 3.8.1.
Enjoy!